
by Chris Koniencki

Hopefully, you have been paying attention to some of our earlier PH Blogs, giving our friends an inside look into how we go about creating new cover designs for our own line of Literary Touchstone Classics editions.
The value of a product is often reflected in the quality of its appearance. At Prestwick House, we take a lot of pride in the design and imagery on our books and feel that our creative work separates our cover art from the competition’s. Whenever possible, the option of using original photography allows us to capture the soul of a book that will stimulate a student’s imagination through a unique visual perspective.
As designers, we are allowed full creative direction throughout the process, and we take that responsibility very seriously. It’s paramount to graphically capture the essence of a book to excite and compel every student who receives one to open it and, even more importantly, to read it. I hope you enjoy reading and seeing how the magic happens behind the curtain!
Main Character
 In the beginning of this year, we decided it was time to re-make The Red Badge of Courage. The biggest challenge during the creative process is usually finding the right model. This novel is about a young soldier in the American Civil War, Henry Fleming. Initially, the young boy is untested in battle, but he soon discovers the horrors of war, the indifference that the Universe has for a single individual, and how insignificant his existence is. Shedding his early unrealistic concepts of war, he first flees from it, but soon grows into a hardened veteran. The main character, Henry Fleming, wound up being an easy decision, and I didn’t have to look very far to find the ideal young man the book depicts — My sixteen-year-old son Clay was perfect!

Uniform & Gear
We needed a uniform and props. My coworker Larry mentioned that he had a friend who was a Civil War Reenactment buff and we could possibly reach out to him for help. His name is Mark Giansanti and he is a Historical Economist of Military History at the Delaware Military Academy. Mark was more than happy to supply us with a full Union Soldier uniform and equipment, including a Sharps rifle. I didn’t just want to make a cool cover; it was more important to depict a scene accurately. As I quickly found out, Mark's knowledge and experience were critical for a successful cover. Here are some pictures of Mark showing how the soldier’s gear is properly worn and some poses that a Civil War soldier might realistically make.


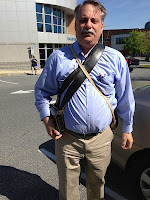
We needed a uniform and props. My coworker Larry mentioned that he had a friend who was a Civil War Reenactment buff and we could possibly reach out to him for help. His name is Mark Giansanti and he is a Historical Economist of Military History at the Delaware Military Academy. Mark was more than happy to supply us with a full Union Soldier uniform and equipment, including a Sharps rifle. I didn’t just want to make a cool cover; it was more important to depict a scene accurately. As I quickly found out, Mark's knowledge and experience were critical for a successful cover. Here are some pictures of Mark showing how the soldier’s gear is properly worn and some poses that a Civil War soldier might realistically make.


The Location
The next detail that needed to be worked out was the location and waiting for the proper time of year. The scene I wanted to portray was after an eight-day battle that took place in May in Chancellorsville, Virginia. I decided to do the photo shoot in a wooded area on the Perkiomen Trail located in Schwenksville, Pennsylvania, a place that I’m very familiar with.


The next detail that needed to be worked out was the location and waiting for the proper time of year. The scene I wanted to portray was after an eight-day battle that took place in May in Chancellorsville, Virginia. I decided to do the photo shoot in a wooded area on the Perkiomen Trail located in Schwenksville, Pennsylvania, a place that I’m very familiar with.


A Family Affair
With the many small details and responsibilities to ensure getting the right shot, I turned my photo shoot into a family affair with some help from all my kids. Along with Clay, and his two sisters, Anna and Alina, we set off to get our shot. Anna, my 13 year old, whose many talents include having a sharp eye for detail, was in charge of make-up. Alina, who is twelve, was in charge of documenting our day for this blog using my iPhone camera and helping me carry my equipment and props to the different locations on the trail while also looking for the best spots.
With the many small details and responsibilities to ensure getting the right shot, I turned my photo shoot into a family affair with some help from all my kids. Along with Clay, and his two sisters, Anna and Alina, we set off to get our shot. Anna, my 13 year old, whose many talents include having a sharp eye for detail, was in charge of make-up. Alina, who is twelve, was in charge of documenting our day for this blog using my iPhone camera and helping me carry my equipment and props to the different locations on the trail while also looking for the best spots.
On Location
Once we arrived, we unpacked and got right to work starting with getting our character into his uniform and strapping on his military gear. This was when I recognized how important Mark’s details about how to properly wear the uniform were... Huge!


Once we arrived, we unpacked and got right to work starting with getting our character into his uniform and strapping on his military gear. This was when I recognized how important Mark’s details about how to properly wear the uniform were... Huge!


The Small Details
The character needed to look weathered and beaten down from battle. Here’s Anna applying the makeup. She was an artist!

The bloody bandage on the soldier’s head wound is a significant aspect of symbolism. I knew it had to be just right. I ripped up a sheet for the bandage and applied the fake blood. Then wrapped the head.


Next I painted on some finishing touches and perfecto!


And, finally, here are some images of the actual shoot.
 |
| Final Image |
 |
| Finished Cover |
Side Notes
Since we had to wait for the right season we had time for Clay let his hair grow out, which did not please his mother too much. Here’s a shot of Clay the day of and the day after the shoot.


Here are some fun extra images taken of my crew from my iPhone using the Hipstamatic App with Jimmy Lens and D-Type B&W film.


Thanks for reading!
Chris Koniencki is a Graphic Designer at Prestwick House.
No comments:
Post a Comment